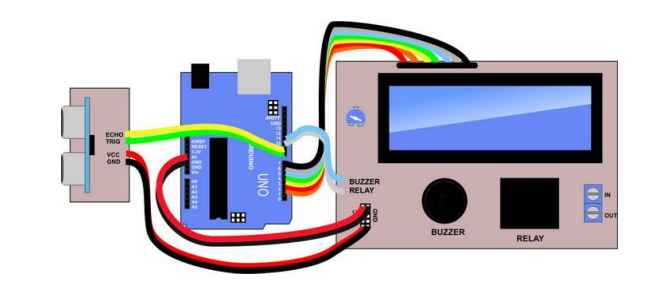
Wednesday, November 18, 2015

simple facedetection open cv visual studio

#include "stdafx.h"
#include "cv.h"
#include "highgui.h"

//fungsi deteksi wajah
void detect_and_draw(IplImage* img){
 //inisialisasi
 CvHaarClassifierCascade *cascade=0;
 CvMemStorage *storage=0;

 IplImage* gray=img;

 //baca file xml u/ image detection
 if(!cascade){
  char * file="C:/OpenCV2.1/data/haarcascades/haarcascade_frontalface_alt.xml";
  cascade=(CvHaarClassifierCascade*) cvLoad(file, 0, 0, 0);
  storage=cvCreateMemStorage(0);
 }

 //deteksi wajah
 CvSeq* faces=cvHaarDetectObjects(
  gray,
  cascade,
  storage,
  1.1,
  3,
  CV_HAAR_DO_CANNY_PRUNING,
  cvSize(10, 10));

 int i;

 //menggambar kotak merah pd bagian wajah yg ditemukan
 for(i=0; i<(faces ? faces->total : 0) ; i++){
  CvRect* r=(CvRect*) cvGetSeqElem(faces, i);
  cvRectangle(img,
   cvPoint(r->x, r->y),
   cvPoint(r->x + r->width, r->y + r->height),
   CV_RGB(255, 0, 0),
   1, 8, 0
   );
 }

 //menampilkan gambar hasil deteksi
 cvNamedWindow("hasil");
 cvShowImage("hasil", img);

 cvWaitKey(0);
}

int main(array<System::String ^> ^args){
 //load image asli
 const char* filename="dank.jpg";
 IplImage* img=cvLoadImage(filename);

 //panggil fungsi
 detect_and_draw(img);
}

Monday, November 2, 2015

Red tracking color MATLAB


programnya.....


close all;
clear all;
clc;

% spesifikasi format webcam yang digunakan
vid=videoinput('winvideo',1,'YUY2_320x240');
set(vid,'TriggerRepeat',Inf);
vid.returnedcolorspace='rgb';
vid.FrameGrabInterval=2;

start(vid)

while(vid.FramesAcquired<=200)
    
    % mengambil citra dari video
    data = getsnapshot(vid);
    % Untuk mendeteksi objek berwarna merah yang bergerak
    % Diperlukan pengurangan komponen warna merah 
    % Mengekstrak komponen warna merah dari citra grayscale 
    diff_im = imsubtract(data(:,:,1), rgb2gray(data));
    % Filterisasi menggunakan filter median untuk menghilangkan noise
    diff_im = medfilt2(diff_im, [3 3]);
    % Konversi grayscale ke biner
    diff_im = im2bw(diff_im,0.18);
    % Menghilangkan semua pixel kurang dari 300 px
    diff_im = bwareaopen(diff_im,300);
    % Memberi label semua komponen yang terkoneksi pada citra
    bw = bwlabel(diff_im, 8);

    % Berikut ini adalah sintak untuk mengkarakterisasi tiap bagian label.
    stats = regionprops(bw, 'BoundingBox', 'Centroid');
    
    % Menampilkan citra hasil snapshot
    imshow(data)
    
    hold on
    
    % Berikut adalah logika loop untuk membuat box kotak yang mengitari objek warna merah.
    for object = 1:length(stats)
        bb = stats(object).BoundingBox;
        bc = stats(object).Centroid;
        rectangle('Position',bb,'EdgeColor','r','LineWidth',2)
        plot(bc(1),bc(2), '-m+')
        bc(2)
        a=text(bc(1)+15,bc(2),strcat('X:',num2str(round(bc(1))),'Y:',num2str(round(bc(2)))));
        set(a,'FontName','Arial','FontWeight','bold','FontSize',12,'Color','red');
    end
    
    hold off
end
stop(vid)


Skin face detection MATLAB


PROGRAM
% spesifikasi format webcam yang digunakan
vid = videoinput('winvideo',1,'YUY2_320x240');
set(vid, 'FramesPerTrigger', Inf);
set(vid, 'ReturnedColorspace', 'rgb')
vid.FrameGrabInterval = 5;

% memulai program  
start(vid)


while(vid.FramesAcquired<=100)

data = getsnapshot(vid);
diff_im = imsubtract(data(:,:,1), rgb2gray(data));
diff_im = medfilt2(diff_im, [3 3]);
diff_im = imadjust(diff_im);
level = graythresh(diff_im);
bw = im2bw(diff_im,level);
BW5 = imfill(bw,'holes');
bw6 = bwlabel(BW5, 8);
stats = regionprops(bw6,['basic']);
[N,M]=size(stats);
if (bw==0)
        break;
else

     tmp = stats(1);
for i = 2 : N
      if stats(i).Area > tmp.Area
        tmp = stats(i);
      end
   
end
bb = tmp.BoundingBox;
bc = tmp.Centroid;

imshow(data)
hold on
rectangle('Position',bb,'EdgeColor','r','LineWidth',2)
hold off
end
end

stop(vid);

% Flush all the image data stored in the memory buffer.
flushdata(vid);

% Clear semua variabel
clear all


MATLAB Tracking object


programnya

close all;
clear all;
clc;

% spesifikasi format webcam yang digunakan
vid=videoinput('winvideo',1,'YUY2_320x240');
set(vid,'TriggerRepeat',Inf);
vid.returnedcolorspace='rgb';
vid.FrameGrabInterval=2;

start(vid)

while(vid.FramesAcquired<=100)% frame harus lebih besar dari tic toc
    tic
    for f=1:50;% nilai ini harus lebih kecil dari frame
    % mengambil citra dari video
    data = getsnapshot(vid);
    %proses flip agar posisi citra berhadapan dengan objek
    R=data(:,:,1);
    R=fliplr(R);
    G=data(:,:,2);
    G=fliplr(G);
    B=data(:,:,3);
    B=fliplr(B);
    data=cat(3,R,G,B);
    % Untuk mendeteksi objek berwarna merah yang bergerak
    % Diperlukan pengurangan komponen warna merah
    % Mengekstrak komponen warna merah dari citra grayscale
    diff_im = imsubtract(data(:,:,1), rgb2gray(data));
    % Filterisasi menggunakan filter median untuk menghilangkan noise
    diff_im = medfilt2(diff_im, [3 3]);
    % Konversi grayscale ke biner
    diff_im = im2bw(diff_im,0.18);
    % Menghilangkan semua pixel kurang dari 300 px
    diff_im = bwareaopen(diff_im,300);
    % Memberi label semua komponen yang terkoneksi pada citra
    bw = bwlabel(diff_im, 8);

    % Berikut ini adalah sintak untuk mengkarakterisasi tiap bagian label.
    stats = regionprops(bw, 'BoundingBox', 'Centroid');
   
    % Menampilkan citra hasil snapshot
    imshow(data)
   
    hold on
   
    % Berikut adalah logika loop untuk membuat box kotak yang mengitari objek warna merah.
    for object = 1:length(stats)
        bb = stats(object).BoundingBox;
        bc = stats(object).Centroid;
        rectangle('Position',bb,'EdgeColor','r','LineWidth',2)
        plot(bc(1),bc(2), '-m+')
        sumbux(f)=bc(1);
        sumbuy(f)=bc(2);
       
        a=text(bc(1)+15,bc(2),strcat('X:',num2str(round(bc(1))),'Y:',num2str(round(bc(2)))));
        set(a,'FontName','Arial','FontWeight','bold','FontSize',12,'Color','red');
    end
   
    hold off
    end
end
stop(vid)
t=toc;
t1=t/50:t/50:t

% menampilkan grafik gerak objek
figure
subplot(3,1,1)
plot(t1,sumbux,'r-')
xlabel('Waktu t(s)')
ylabel('Kordinat x')
title('Kordinat x terhadap t','fontsize',14,'fontname','Arial')
subplot(3,1,2)
plot(t1,sumbuy,'r-')
xlabel('Waktu t(s)')
ylabel('Kordinat y')
title('Kordinat y terhadap t','fontsize',14,'fontname','Arial')
subplot(3,1,3)
plot(sumbux,sumbuy,'r-')
xlabel('Kordinat x')
ylabel('Kordinat y')
title('Kordinat y vs x','fontsize',14,'fontname','Arial')


Program GUI matlab robot PC


programnya.....


function varargout = guivisiBOT(varargin)
% GUIVISIBOT MATLAB code for guivisiBOT.fig
%      GUIVISIBOT, by itself, creates a new GUIVISIBOT or raises the existing
%      singleton*.
%
%      H = GUIVISIBOT returns the handle to a new GUIVISIBOT or the handle to
%      the existing singleton*.
%
%      GUIVISIBOT('CALLBACK',hObject,eventData,handles,...) calls the local
%      function named CALLBACK in GUIVISIBOT.M with the given input arguments.
%
%      GUIVISIBOT('Property','Value',...) creates a new GUIVISIBOT or raises the
%      existing singleton*.  Starting from the left, property value pairs are
%      applied to the GUI before guivisiBOT_OpeningFcn gets called.  An
%      unrecognized property name or invalid value makes property application
%      stop.  All inputs are passed to guivisiBOT_OpeningFcn via varargin.
%
%      *See GUI Options on GUIDE's Tools menu.  Choose "GUI allows only one
%      instance to run (singleton)".
%
% See also: GUIDE, GUIDATA, GUIHANDLES

% Edit the above text to modify the response to help guivisiBOT

% Last Modified by GUIDE v2.5 19-May-2014 12:35:31

% Begin initialization code - DO NOT EDIT
gui_Singleton = 1;
gui_State = struct('gui_Name',       mfilename, ...
                   'gui_Singleton',  gui_Singleton, ...
                   'gui_OpeningFcn', @guivisiBOT_OpeningFcn, ...
                   'gui_OutputFcn',  @guivisiBOT_OutputFcn, ...
                   'gui_LayoutFcn',  [] , ...
                   'gui_Callback',   []);
if nargin && ischar(varargin{1})
    gui_State.gui_Callback = str2func(varargin{1});
end

if nargout
    [varargout{1:nargout}] = gui_mainfcn(gui_State, varargin{:});
else
    gui_mainfcn(gui_State, varargin{:});
end
% End initialization code - DO NOT EDIT


% --- Program Opening Video Webcam 
function guivisiBOT_OpeningFcn(hObject, eventdata, handles, varargin)
% This function has no output args, see OutputFcn.
% hObject    handle to figure
% eventdata  reserved - to be defined in a future version of MATLAB
% handles    structure with handles and user data (see GUIDATA)
% varargin   command line arguments to guivisiBOT (see VARARGIN)

% Choose default command line output for guivisiBOT
handles.output = hObject;
% Update handles structure
guidata(hObject, handles);


% UIWAIT makes guivisiBOT wait for user response (see UIRESUME)
% uiwait(handles.figure1);


% --- Outputs from this function are returned to the command line.
function varargout = guivisiBOT_OutputFcn(hObject, eventdata, handles) 
% varargout  cell array for returning output args (see VARARGOUT);
% hObject    handle to figure
% eventdata  reserved - to be defined in a future version of MATLAB
% handles    structure with handles and user data (see GUIDATA)

% Get default command line output from handles structure
varargout{1} = handles.output;


% --- Program Perintah BELOK KIRI
function kiri_Callback(hObject, eventdata, handles)
% hObject    handle to kiri (see GCBO)
% eventdata  reserved - to be defined in a future version of MATLAB
% handles    structure with handles and user data (see GUIDATA)
global s
fwrite(s,'Z');


% --- Program perintah BELOK KANAN
function kanan_Callback(hObject, eventdata, handles)
% hObject    handle to kanan (see GCBO)
% eventdata  reserved - to be defined in a future version of MATLAB
% handles    structure with handles and user data (see GUIDATA)
global s
fwrite(s,'A');


% --- Program perintah MAJU
function maju_Callback(hObject, eventdata, handles)
% hObject    handle to maju (see GCBO)
% eventdata  reserved - to be defined in a future version of MATLAB
% handles    structure with handles and user data (see GUIDATA)
global s
fwrite(s,'K');


% --- Program perintah MUNDUR
function mundur_Callback(hObject, eventdata, handles)
% hObject    handle to mundur (see GCBO)
% eventdata  reserved - to be defined in a future version of MATLAB
% handles    structure with handles and user data (see GUIDATA)
global s
fwrite(s,'M');


% --- Program perintah DIAM
function diam_Callback(hObject, eventdata, handles)
% hObject    handle to diam (see GCBO)
% eventdata  reserved - to be defined in a future version of MATLAB
% handles    structure with handles and user data (see GUIDATA)
global s
fwrite(s,'O');


function edit1_Callback(hObject, eventdata, handles)
% hObject    handle to edit1 (see GCBO)
% eventdata  reserved - to be defined in a future version of MATLAB
% handles    structure with handles and user data (see GUIDATA)

% Hints: get(hObject,'String') returns contents of edit1 as text
%        str2double(get(hObject,'String')) returns contents of edit1 as a double


% --- Executes during object creation, after setting all properties.
function edit1_CreateFcn(hObject, eventdata, handles)
% hObject    handle to edit1 (see GCBO)
% eventdata  reserved - to be defined in a future version of MATLAB
% handles    empty - handles not created until after all CreateFcns called

% Hint: edit controls usually have a white background on Windows.
%       See ISPC and COMPUTER.
if ispc && isequal(get(hObject,'BackgroundColor'), get(0,'defaultUicontrolBackgroundColor'))
    set(hObject,'BackgroundColor','white');
end


function edit2_Callback(hObject, eventdata, handles)
% hObject    handle to edit2 (see GCBO)
% eventdata  reserved - to be defined in a future version of MATLAB
% handles    structure with handles and user data (see GUIDATA)

% Hints: get(hObject,'String') returns contents of edit2 as text
%        str2double(get(hObject,'String')) returns contents of edit2 as a double


% --- Executes during object creation, after setting all properties.
function edit2_CreateFcn(hObject, eventdata, handles)
% hObject    handle to edit2 (see GCBO)
% eventdata  reserved - to be defined in a future version of MATLAB
% handles    empty - handles not created until after all CreateFcns called

% Hint: edit controls usually have a white background on Windows.
%       See ISPC and COMPUTER.
if ispc && isequal(get(hObject,'BackgroundColor'), get(0,'defaultUicontrolBackgroundColor'))
    set(hObject,'BackgroundColor','white');
end


% --- Executes on button press in koneksi.
function koneksi_Callback(hObject, eventdata, handles)
% hObject    handle to koneksi (see GCBO)
% eventdata  reserved - to be defined in a future version of MATLAB
% handles    structure with handles and user data (see GUIDATA)
global s
myform=guidata(gcbo);
aa=get(myform.edit1,'String');
bb=str2double(get(myform.edit2,'String'));
s=serial(aa,'Baudrate',bb,'DataBits',8,'StopBits',1,'InputBufferSize',16000);
fopen(s);


% --- Executes on button press in diskoneksi.
function diskoneksi_Callback(hObject, eventdata, handles)
% hObject    handle to diskoneksi (see GCBO)
% eventdata  reserved - to be defined in a future version of MATLAB
% handles    structure with handles and user data (see GUIDATA)
global s
clear s;
close;


ROBOT KONTROL KOMPUTER arduino


programnya .....

// ROBOT KONTROL KOMPUTER

// Definisi awal

int kiriA = 9;
int kiriB = 6;
int kananA = 5;
int kananB = 3;

void setup()
{
  Serial.begin(9600);
  pinMode(kiriA,OUTPUT);
  pinMode(kiriB,OUTPUT);
  pinMode(kananA,OUTPUT);
  pinMode(kananB,OUTPUT);
}

void loop()
{
  if(Serial.available()>0)
  {
    byte dataku=Serial.read();
    if (dataku=='M')
    {
      digitalWrite(kiriA,HIGH);
      digitalWrite(kiriB,LOW);
      digitalWrite(kananA,HIGH);
      digitalWrite(kananB,LOW);
      Serial.println("ROBOT MUNDUR");
    }
    else if (dataku=='Z')
    {
      digitalWrite(kiriA,LOW);
      digitalWrite(kiriB,HIGH);
      digitalWrite(kananA,LOW);
      digitalWrite(kananB,HIGH);
      Serial.println("ROBOT MAJU");
    }
    else if (dataku=='Y')
    {
      digitalWrite(kiriA,LOW);
      digitalWrite(kiriB,HIGH);
      digitalWrite(kananA,HIGH);
      digitalWrite(kananB,LOW);
      Serial.println("ROBOT BELOK KIRI");
    }
    else if (dataku=='X')
    {
      digitalWrite(kiriA,HIGH);
      digitalWrite(kiriB,LOW);
      digitalWrite(kananA,LOW);
      digitalWrite(kananB,HIGH);
      Serial.println("ROBOT BELOK KANAN");
    }
    else
    {
      digitalWrite(kiriA,LOW);
      digitalWrite(kiriB,LOW);
      digitalWrite(kananA,LOW);
      digitalWrite(kananB,LOW);
      Serial.println("ROBOT DIAM");
    }
  }
 
}


Sunday, October 25, 2015

face detection opencv dan visual studio


programnya............

#include "visualcontrol.h"
#include "webcamwidget.h"
#include <boost/bind.hpp>
#include <boost/filesystem.hpp>

#include <QDebug>
#include <QCloseEvent>
#include <QVBoxLayout>
#include <QHBoxLayout>
#include <QListWidget>
#include <QPushButton>
#include <QMessageBox>
#include <QInputDialog>
#include <logger.h>

#include "cognition/detector/facedetector.h"
#include "cognition/trainerimage.h"

namespace gui
{

const cv::Size VisualControl::testImageSize(150,200);

VisualControl::VisualControl(QWidget *parent, Qt::WFlags flags)
: QMainWindow(parent, flags)
{
setupFramework();
setupGUI();

setMinimumSize(QSize(640,480));

frameCaptureThread = boost::thread(
boost::bind(&cognition::FrameCapture::startCapturing, frameCapture));

faceDetectorThread = boost::thread(
boost::bind(&cognition::Detector::threadStart, faceDetector));

Logger::getInstance().log("Ready...");
}

VisualControl::~VisualControl()
{
}

void VisualControl::setupFramework()
{
using boost::shared_ptr;
using cognition::DetailedFaceDetector;
using cognition::EigenfaceRecognizer;

//videoCapture = shared_ptr<VideoCapture>( new VideoCapture(0) );
frameCapture = shared_ptr<cognition::FrameCapture>( new cognition::FrameCapture(32) );

//update the path of the classifier to the local path of your openCV installation!
faceDetector = shared_ptr<DetailedFaceDetector>(
new DetailedFaceDetector(DetailedFaceDetector::ALL,
"haarcascades/haarcascade_frontalface_alt.xml",
frameCapture.get(), false, 1.16));

faceDetector->loadCascade(DetailedFaceDetector::EYES, "haarcascades/haarcascade_eye.xml");
faceDetector->loadCascade(DetailedFaceDetector::NOSE, "haarcascades/haarcascade_mcs_nose.xml");
faceDetector->loadCascade(DetailedFaceDetector::MOUTH, "haarcascades/haarcascade_mcs_mouth.xml");

frameCapture->addFrameReceiver(faceDetector.get());

recognizer = shared_ptr<EigenfaceRecognizer>( new cognition::EigenfaceRecognizer );
}

void VisualControl::closeEvent(QCloseEvent *event)
{
//webcamController->unregister();
faceDetector->removeController(webcamWidget);

//qDebug() << "controller count = " << faceDetector->getControllerCount();

frameCapture->stopCapturing();

faceDetector->requestTreadStop();

frameCaptureThread.interrupt();

faceDetectorThread.interrupt();

// qDebug() << "Close event called, joining";
frameCaptureThread.join();

faceDetectorThread.join();

//event->accept();

//QMainWindow::closeEvent(event);
}

void VisualControl::setupGUI()
{
webcamWidget = new WebcamWidget(this, frameCapture.get());

faceDetector->addController(webcamWidget);

logWidget = new QListWidget;

captureTrainingImageButton = new QPushButton(tr("Capture face and store it as training image"));
connect(captureTrainingImageButton, SIGNAL(clicked()), this, SLOT(captureTrainingImage()));

trainRecognizerButton = new QPushButton(tr("Train recognizer"));
connect(trainRecognizerButton, SIGNAL(clicked()), this, SLOT(trainRecognizer()));

recognizeFaceButton = new QPushButton(tr("Recognize Visible Faces"));
connect(recognizeFaceButton, SIGNAL(clicked()), this, SLOT(recognizeFaces()));

QWidget *centralWidget = new QWidget;
QVBoxLayout *mainLayout = new QVBoxLayout;
QHBoxLayout *buttonsLayout = new QHBoxLayout;

buttonsLayout->addWidget(captureTrainingImageButton);
buttonsLayout->addWidget(trainRecognizerButton);
buttonsLayout->addWidget(recognizeFaceButton);

mainLayout->addWidget(webcamWidget);
mainLayout->addLayout(buttonsLayout);
mainLayout->addWidget(logWidget);

centralWidget->setLayout(mainLayout);

Logger::getInstance().setLogWidget(logWidget);

setCentralWidget(centralWidget);
}

void VisualControl::captureTrainingImage()
{
cv::Mat frame;
cognition::Detector::RectVector faces;

captureFrameAndFaces(faces, frame);

if(faces.size() == 0)
{
QMessageBox::information(this, "No faces found", "The detector did not find any faces!");
}
else
{
frame = frame.clone();
cognition::TrainerImage convertor(testImageSize, true, "images/");
cv::Mat faceRegion;
for(std::vector<cv::Rect>::iterator face = faces.begin(); face != faces.end(); ++face)
{
faceRegion = frame(*face);
QString filename = QInputDialog::getText(this,
tr("Image name"),
tr("enter image name (enter extension too, it determines the image format!)"));

if(filename.size() < 1) continue;

if(!convertor.processAndSaveImage(faceRegion, filename.toStdString()))
QMessageBox::information(this, "Failed", "Could not process and save the image!");
}
}
}

void VisualControl::trainRecognizer()
{
using namespace boost::filesystem;

path dir("images");
directory_iterator end;

for(directory_iterator file(dir); file != end; ++file)
{
if(is_regular_file(*file))
recognizer->addTrainingImage(file->path().string(), file->filename());
}

if(recognizer->train())
QMessageBox::information(this, "Success", "The recognizer has succesfully finished training!");
else
QMessageBox::information(this, "Error", "The recognizer has indicated that it did not train correctly!");
}

void VisualControl::recognizeFaces()
{
if(recognizer->trained())
{
cv::Mat frame;
cognition::Detector::RectVector faces;

captureFrameAndFaces(faces, frame);

if(faces.size() == 0)
QMessageBox::information(this, "No faces found", "The detector did not find any faces!");
else
{
frame = frame.clone();
cognition::TrainerImage convertor(testImageSize, true);
cv::Mat faceRegion;
cv::Mat processedFace;

for(std::vector<cv::Rect>::iterator face = faces.begin(); face != faces.end(); ++face)
{
faceRegion = frame(*face);
processedFace = convertor.processImage(faceRegion);
std::string name = recognizer->recognize(processedFace);
Logger::getInstance().log(std::string("Recognized: ") + name);
}
}
}
else
{
QMessageBox::information(this, "Recognizer is not trained", "Recognizer is not trained or failed to train, add enough training images and train the recognizer!");
}
}

void VisualControl::captureFrameAndFaces(cognition::Detector::RectVector &rects, cv::Mat &frame)
{
rects = webcamWidget->getCurrentFaces();
frame = webcamWidget->getCurrentFrame();
//cognition::FaceDetector detector("C:/OpenCV2.1/data/haarcascades/haarcascade_frontalface_alt.xml");
//*frameCapture->getCaptureDevice() >> frame;

//detector.receiveFrame(frame);
//detector.processFrame();
//rects = detector.getAreas();
}
}


Friday, October 23, 2015

volume control tangki air arduino

flowchart

programnya.....

/*-----------------------------------------------------
'  
'     VOLUME CONTROL TANGKI AIR
'     TRIG --> Pin 9
'     ECHO --> Pin 8
'     RELAY --> Pin 10
'     Hasilnya tampilkan ke LCD
'
'------------------------*/

#define ECHOPIN 9                          
#define TRIGPIN 8                          
#include <LiquidCrystal.h>
LiquidCrystal lcd(2, 3, 4, 5,6,7);
unsigned int jarak,timer,T_air,La;
unsigned long Vol;
void setup(){
  lcd.begin(16, 2);
  lcd.print("   WATER LEVEL");
  lcd.setCursor(0, 1);
  lcd.print("     CONTROL  ");
  delay(2000);
  lcd.clear();
  lcd.print("Volume=");
  lcd.setCursor(0,1);
  lcd.print("Status=");

  pinMode(ECHOPIN, INPUT);
  pinMode(TRIGPIN, OUTPUT);
  pinMode(10,OUTPUT);
  // tinggi tangki 1 m (100 cm)
  // diameter alas 60 cm
  // Luas alas = 3.14x30x30 = 2826 cm2
  La=2826;

}

void loop(){
  digitalWrite(TRIGPIN, LOW);                
  delayMicroseconds(2);
  digitalWrite(TRIGPIN, HIGH);                
  delayMicroseconds(10);
  digitalWrite(TRIGPIN, LOW);                
  timer = pulseIn(ECHOPIN, HIGH);      
  jarak= timer/58;                      
  if (jarak>100)jarak=100;
  T_air=100-jarak;
  Vol=(unsigned long)La*T_air/1000;

  lcd.setCursor(7,0);
  lcd.print(Vol);
  lcd.print(" L ");
  if(Vol<100){
      lcd.setCursor(7,1);
      lcd.print("Pompa ON ");
      digitalWrite(10,1);    
  }
  else if(Vol>250){
      lcd.setCursor(7,1);
      lcd.print("Pompa OFF");
      digitalWrite(10,0);    
  }

  delay(500);
}


Thursday, October 22, 2015

tongkat tunatentra ultrasonik arduino

flowchart
programnya...............
/*-----------------------------------------------------
'     
'     TONGKAT TUNA NETRA
'     TRIG --> Pin 8
'     ECHO --> Pin 9
'     BUZZER --> Pin 11
'     Hasilnya tampilkan ke LCD
'    
'------------------------*/

#define ECHOPIN 9                            
#define TRIGPIN 8                            

int jarak,timer;
void setup(){
    pinMode(ECHOPIN, INPUT);
  pinMode(TRIGPIN, OUTPUT);
  pinMode(11,OUTPUT);
}

void loop(){
  digitalWrite(TRIGPIN, LOW);                   
  delayMicroseconds(2);
  digitalWrite(TRIGPIN, HIGH);                  
  delayMicroseconds(10);
  digitalWrite(TRIGPIN, LOW);                   
  timer = pulseIn(ECHOPIN, HIGH);        
  jarak= timer/58;                        
  if (jarak>200){
      digitalWrite(11,0);
  }
  else if(jarak>100){
      digitalWrite(11,1);
      delay(1000);
      digitalWrite(11,0);
      delay(1000);
  }
  else {      
      digitalWrite(11,1);
      delay(200);
      digitalWrite(11,0);
      delay(200);
  }


}


kran otomatis arduino dan ultrasonik


flowchart

programnya.........
/*-----------------------------------------------------
'  
'     KRAN OTOMATIS
'     TRIG --> Pin 8
'     ECHO --> Pin 9
'     Relay --> Pin 10
'     Hasilnya tampilkan ke LCD
'  
'------------------------*/

#define ECHOPIN 9                        
#define TRIGPIN 8                          
#include <LiquidCrystal.h>
LiquidCrystal lcd(2, 3, 4, 5,6,7);
unsigned int jarak, timer;

void setup(){
  lcd.begin(16, 2);
  lcd.print("KRAN OTOMATIS ");
  lcd.setCursor(0, 1);
  lcd.print("Kondisi=");
  delay(2000);
 
  pinMode(ECHOPIN, INPUT);
  pinMode(TRIGPIN, OUTPUT);
  pinMode(10, OUTPUT);

}

void loop(){
  digitalWrite(TRIGPIN, LOW);                
  delayMicroseconds(2);
  digitalWrite(TRIGPIN, HIGH);                
  delayMicroseconds(10);
  digitalWrite(TRIGPIN, LOW);                
  timer = pulseIn(ECHOPIN, HIGH);      
  jarak= timer/58;                      
  if(jarak<10) {
      lcd.setCursor(8, 1);
      lcd.print("Open  ");
      digitalWrite(10,1);
  }
   else{
       lcd.setCursor(8, 1);
       lcd.print("Closed");
       digitalWrite(10,0);
   }
   delay(100);
}

penghitung jumlah orang otomatis pake arduino

flowchart

/*-----------------------------------------------------
'  
'     PENGHITUNG JUMLAH ORANG
'     TRIG --> Pin 8
'     ECHO --> Pin 9
'     Hasilnya tampilkan ke LCD
'  
'------------------------*/

#define ECHOPIN 9                          
#define TRIGPIN 8                          
#include <LiquidCrystal.h>
LiquidCrystal lcd(2, 3, 4, 5,6,7);
unsigned int jarak,timer,Jml;
void setup(){
  lcd.begin(16, 2);
  lcd.print("   PENGHITUNG  ");
  lcd.setCursor(0, 1);
  lcd.print("  JUMLAH ORANG");
  delay(2000);
  lcd.clear();
  lcd.print("Jumlah=");

  pinMode(ECHOPIN, INPUT);
  pinMode(TRIGPIN, OUTPUT);

}

void loop(){
  digitalWrite(TRIGPIN, LOW);                
  delayMicroseconds(2);
  digitalWrite(TRIGPIN, HIGH);                
  delayMicroseconds(10);
  digitalWrite(TRIGPIN, LOW);                
  timer = pulseIn(ECHOPIN, HIGH);      
  jarak= timer/58;                      
  if (jarak<20){
      Jml++;
      lcd.setCursor(7,0);
      lcd.print(Jml);
  }
  delay(500);

}

penghitung tinggi badan arduino


flowchart

/*-----------------------------------------------------
'     
'     PENGHITUNG TINGGI BADAN
'     TRIG --> Pin 8
'     ECHO --> Pin 9
'     Hasilnya tampilkan ke LCD
'
'------------------------*/

#define ECHOPIN 9                           
#define TRIGPIN 8                            
#include <LiquidCrystal.h>
LiquidCrystal lcd(2, 4, 6, 7,8,9);
unsigned int jarak,timer,Tinggi;
void setup(){
  lcd.begin(16, 2);
  lcd.print("   PENGHITUNG  " );
  lcd.setCursor(0, 1);
  lcd.print("  TINGGI BADAN");
  delay(2000);
  lcd.clear();
  lcd.print("Tinggi=");
  
  pinMode(ECHOPIN, INPUT);
  pinMode(TRIGPIN, OUTPUT);
  
}

void loop(){
  digitalWrite(TRIGPIN, LOW);                   
  delayMicroseconds(2);
  digitalWrite(TRIGPIN, HIGH);                  
  delayMicroseconds(10);
  digitalWrite(TRIGPIN, LOW);                   
  timer = pulseIn(ECHOPIN, HIGH);        
  jarak= timer/58;                        
  
  if (jarak>200) jarak=200;
  Tinggi=200-jarak;
  lcd.setCursor(7,0);
  lcd.print(Tinggi);
  lcd.print(" cm ");
  delay(600);
  
}


Early warning system Banjir via sms

flowchart
/*-----------------------------------------------------

'     SMS ERALY WARNING
'     TRIG --> Pin 8
'     ECHO --> Pin 9
'     Baud Rate 9600 bps
'     Hasilnya tampilkan ke LCD

'------------------------*/

#include <SoftwareSerial.h>
#include <LiquidCrystal.h>

#define ECHOPIN 9                          
#define TRIGPIN 8

LiquidCrystal lcd(2, 3, 4, 5,6,7);
unsigned int jarak, timer;
byte f1,f2,f3;

String inString="";
char str,f;
int distance,l,b,s;
const int rxpin = 10; // pin used to receive
const int txpin = 11; // pin used to transmit
SoftwareSerial gsm(rxpin, txpin);
String noHP;

String statusbanjir="",isisms;

//************************************
void setup() {
  Serial.begin(9600);
  gsm.begin(9600);
  pinMode(ECHOPIN, INPUT);
  pinMode(TRIGPIN, OUTPUT);
  //----- NOMOR HP HARUS DIISI DENGAN NOMOR TUJUAN
  noHP="085xxxxxxxxx";
 
  statusbanjir=="Standby";
  lcd.begin(16, 2);
  lcd.print(" Early Warning");
  lcd.setCursor(0, 1);
  lcd.print(" Banjir");
  delay(2000);
  lcd.clear();
  lcd.print("L=");
  lcd.setCursor(0, 1);
  lcd.print("Status");
  delay(1000);

}

void loop() {

  getdistance();
  lcd.setCursor(2,0);
  lcd.print(jarak);
   if(jarak>100)
    {  
      statusbanjir="Standby";
      lcd.setCursor(7,1);
      lcd.print("Aman  ");
    }
  else if ((jarak>75)&&(f1==0))
    {
      lcd.setCursor(7,1);
      lcd.print("Waspada");              
      sendsms(noHP,"WASPADA ! ");delay(1000);
      f1=1;  
    }
 
  else if ((jarak>50)&&(f2==0))
    {  
      lcd.setCursor(7,1);
      lcd.print("Awas !");              
      sendsms(noHP,"AWAS ! ");delay(1000);
      f2=1;
    }
  else if ((jarak>25)&&(f3==0))
    {  
      lcd.setCursor(7,1);
      lcd.print("Bahaya !");              
      sendsms(noHP,"BAHAYA ! ");delay(1000);
      f3=1;
    }

}

void getdistance(){
  digitalWrite(TRIGPIN, LOW);                
  delayMicroseconds(2);
  digitalWrite(TRIGPIN, HIGH);                
  delayMicroseconds(10);
  digitalWrite(TRIGPIN, LOW);                
  timer = pulseIn(ECHOPIN, HIGH);      
  jarak= timer/58;
  delay(50);                                  
}
//----------------------
void sendsms(String nomorHP,String pesan)
{
   gsm.print("AT+CMGS=");
   gsm.write((byte)34);
   gsm.print(nomorHP);
   gsm.write((byte)34);
   gsm.println();  
   delay(1000);
   Serial.println();
   gsm.print(pesan);
   gsm.write((byte)26);
   gsm.println();
   delay(1000);
   delay(2000);
}

alarm parkir mobil dengan arduino


flowchart


alarm parkir mobil dengan arduino
/*-----------------------------------------------------
'     APLIKASI 2
'     ALARM PARKIR MOBIL
'     TRIG --> Pin 8
'     ECHO --> Pin 9
'     BUZZER --> Pin 11
'     Hasilnya tampilkan ke LCD
'  dadan ahmad dani
'------------------------*/

#define ECHOPIN 9                          
#define TRIGPIN 8                          
#include <LiquidCrystal.h>
LiquidCrystal lcd(2, 3, 4, 5,6,7);
int jarak,timer;
void setup(){
  lcd.begin(16, 2);
  lcd.print("   ALARM PARKIR");
  lcd.setCursor(0, 1);
  lcd.print("      MOBIL    ");
  delay(2000);
  lcd.clear();
  lcd.print("Status=");

  pinMode(ECHOPIN, INPUT);
  pinMode(TRIGPIN, OUTPUT);
  pinMode(11,OUTPUT);
}

void loop(){
  digitalWrite(TRIGPIN, LOW);                
  delayMicroseconds(2);
  digitalWrite(TRIGPIN, HIGH);                
  delayMicroseconds(10);
  digitalWrite(TRIGPIN, LOW);                
  timer = pulseIn(ECHOPIN, HIGH);      
  jarak= timer/58;                      
  if (jarak>25){
      lcd.setCursor(7,0);
      lcd.print("Aman    ");
  }
  else if(jarak>20){
      lcd.setCursor(7,0);
      lcd.print("Awas   ");
      digitalWrite(11,1);
      delay(500);
      digitalWrite(11,0);
      delay(500);
  }
  else if(jarak>10){
      lcd.setCursor(7,0);
      lcd.print("Waspada");
      digitalWrite(11,1);
      delay(300);
      digitalWrite(11,0);
      delay(300);
  }
  else {
      lcd.setCursor(7,0);
      lcd.print("Bahaya ");
      digitalWrite(11,1);
      delay(100);
      digitalWrite(11,0);
      delay(100);
  }


}


ULTRASONIC RANGE METER

flowchart ULTRASONIC RANGE METER


/*-----------------------------------------------------
'     APLIKASI 1
'     ULTRASONIC RANGE METER
'     TRIG --> Pin 8
'     ECHO --> Pin 9
'     Hasilnya tampilkan ke LCD
'  
'------------------------*/

#define ECHOPIN 9                          
#define TRIGPIN 8                          
#include <LiquidCrystal.h>
LiquidCrystal lcd(2,3,4,5,6,7);
unsigned int jarak, timer;

void setup(){
  lcd.begin(16, 2);
  lcd.print("   ULTRASONIC");
  lcd.setCursor(0, 1);
  lcd.print("  RANGE METER");
  delay(2000);
  lcd.clear();
  lcd.print("Range=");

  pinMode(ECHOPIN, INPUT);
  pinMode(TRIGPIN, OUTPUT);

}

void loop(){
  digitalWrite(TRIGPIN, LOW);                
  delayMicroseconds(2);
  digitalWrite(TRIGPIN, HIGH);                
  delayMicroseconds(10);
  digitalWrite(TRIGPIN, LOW);                
  timer = pulseIn(ECHOPIN, HIGH);      
  jarak= timer/58;                      
                   
  lcd.setCursor(6, 0);
  lcd.print(jarak);
  lcd.print(" cm ");
  delay(1000);  
}

program telemetri by request

//program telemetri by request
#include <LiquidCrystal.h>
#include <SoftwareSerial.h>
LiquidCrystal lcd(2,3, 4, 5, 6, 7);
const int rxpin = 8;
const int txpin = 9;
SoftwareSerial gsm(rxpin, txpin);

String inString="";
String inString2="";
String Stemp="";
String inbox="";
String noPengirim="";
char str,f;
int adc0,temp,t;
int i,j,k;

void getmodem()
{
 f=1;
 while(f)
 {
   if(gsm.available())  
     {
       str=gsm.read();
       Serial.print(str);      
       switch (str)
         {
           case '\r': break;
           case '\n':f=0; break;
           default:inString+=(char)str;
         }      
     }
 }
}
//=========================
void getmodem2()
{
 f=1;
 inString2="";
 while(f)
 {
   if(gsm.available()>0)
     {
       str=gsm.read();        
       switch (str)
         {
           case '\r': break;
           case '\n':f=0; break;
           default:inString2+=(char)str;
         }
     }
 }
}


void setup()
{
  gsm.begin(9600);
  lcd.begin(16, 2);
  lcd.print("Tes Koneksi ..");
  delay(1000);
  gsm.println("AT");
  getmodem();
  getmodem();
  if(inString=="OK") {
    lcd.clear();
    lcd.print(" Koneksi OK ");
    }
   else{
    lcd.clear();
    lcd.print(" Gagal ... ");
    lcd.setCursor(0,1);
    lcd.print("Coba lagi !");
    while(1);
    }
  delay(2000);
  lcd.clear();
  lcd.print("  Telemetri 2  ");
  lcd.setCursor(0, 1);
  lcd.print("   By Request  ");
  delay(2000);
  lcd.clear();
  lcd.print("  Telemetri 2  ");
  lcd.setCursor(0, 1);
  lcd.print("Tunggu Perintah");      
}
void loop()
{
  getmodem();
  getmodem2();  
  i=inString2.indexOf(':');
  if(i>0)
    {
     Stemp=inString2.substring(0,i);  
     if(Stemp=="+CMTI")
       {      
         i=inString2.indexOf(',');
         j=inString2.length ();
         i=i+1;
         inbox=inString2.substring(i,j);      
         gsm.print("AT+CMGR=");
         gsm.println(inbox);      
         getmodem();
         getmodem();
         getmodem2();
         i=inString.indexOf(',');
         i=i+2;
         j=inString.indexOf(',',i);
         j=j-1;        
         noPengirim=inString.substring(i,j);
         lcd.clear();
         lcd.print("SMS:");      
         lcd.print(inString2);
         if(inString2=="get temp"){
           adc0 = analogRead(0);
           temp=(adc0*5)/10;
           gsm.print("AT+CMGS=");
           gsm.println(noPengirim);
           delay(1000);
           gsm.print("Temperatur=");
           gsm.print(temp);
           gsm.print(" Celcius");
           gsm.write((byte)26);
           gsm.println();
           delay(1000);  
           gsm.print("AT+CMGD=");
           gsm.println(inbox);
          delay(5000);
         }
       }
    }
}

Telemetri : kirim suhu secara continue

//program telemetri continue
#include <LiquidCrystal.h>
#include <SoftwareSerial.h>
LiquidCrystal lcd(2,3, 4, 5, 6, 7);
const int rxpin = 8;
const int txpin = 9;
SoftwareSerial gsm(rxpin, txpin);
String inString="";
char str,f;
int adc0,temp,t;

void getmodem()
{
 f=1;
 while(f)
 {
   if(gsm.available())  
     {
       str=gsm.read();
       Serial.print(str);      
       switch (str)
         {
           case '\r': break;
           case '\n':f=0; break;
           default:inString+=(char)str;
         }      
     }
 }
}

void setup()
{
  gsm.begin(9600);
  lcd.begin(16, 2);
  lcd.print("  Telemetri 1  ");
  lcd.setCursor(0, 1);
  lcd.print("   Continue  ");
  delay(2000);
  lcd.clear();
  lcd.print("Temp=");      
}
void loop()
{
  for(t=0;t<300;t++);{
  adc0 = analogRead(0);
  temp=(adc0*5)/10;
  lcd.setCursor(5,0);
  lcd.print(temp);  
  lcd.print(" Celcius");
  delay(1000);
  }
 //gantilah nomor HP dibaris bawah ini sesuai
 //dg nomor HP yg akan di SMS    
 gsm.println("AT+CMGS=08126752xxxx");
 delay(1000);
 gsm.print("Temperatur=");
 gsm.print(temp);
 gsm.print(" Celcius");
 gsm.write((byte)26);
 gsm.println();  

}